# 介绍

术之尽头,炁体源流
编程尽头,数据结构
编程的真相:数据的处理
数据结构的本质是一门专门研究数据如何组织、存储和操作的科目
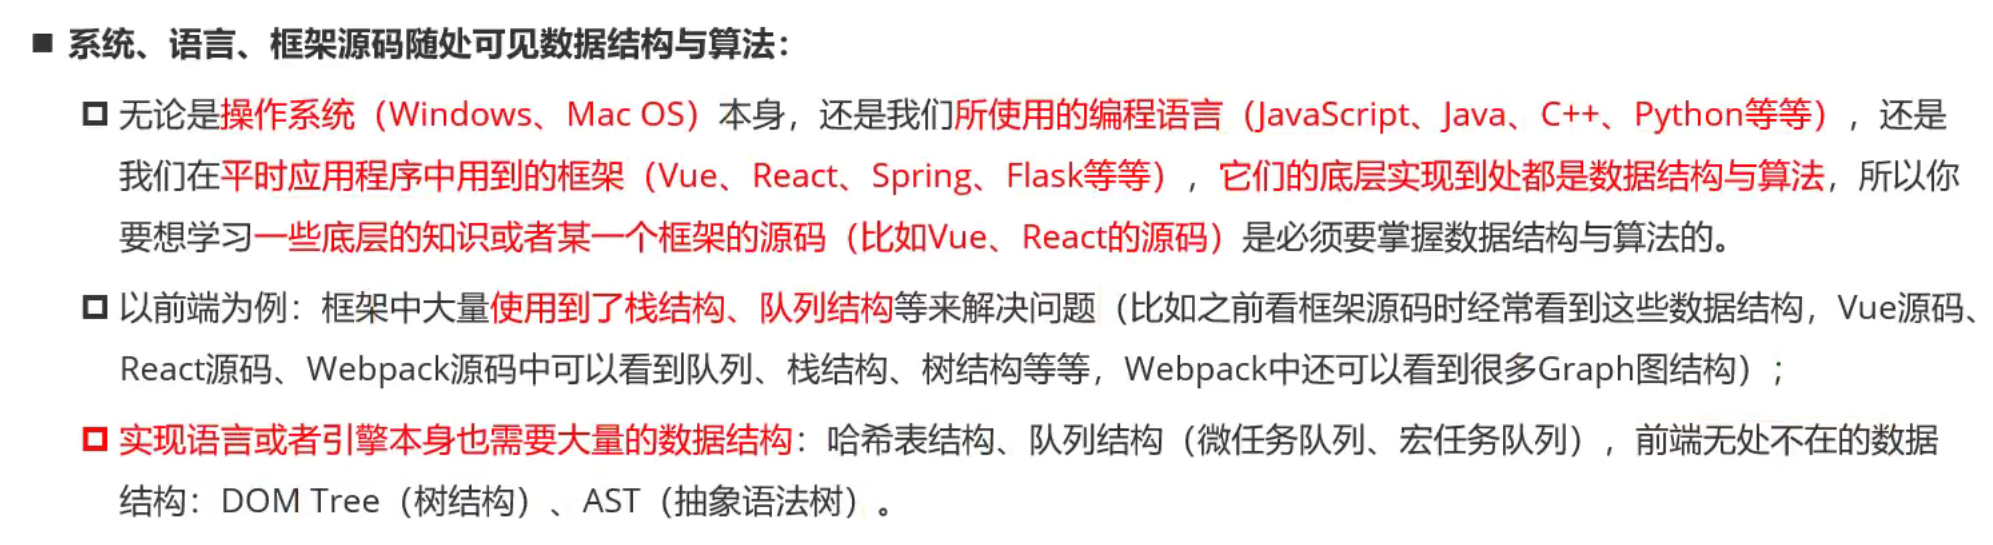
学习数据结构与算法的实际应用
![image-20231017223537651]()
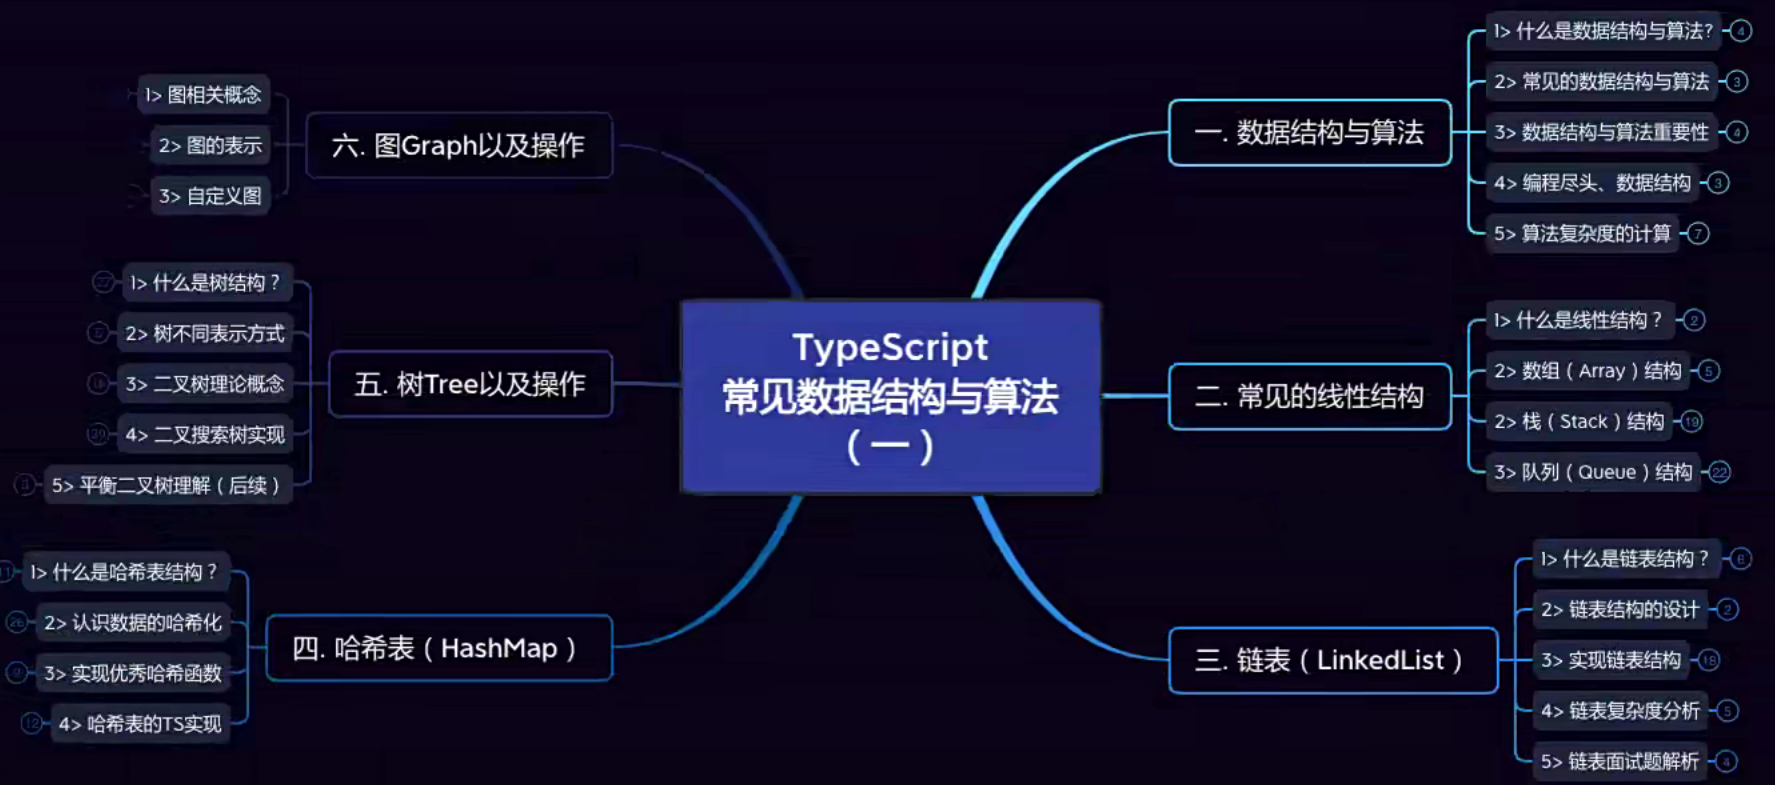
常见数据结构与算法
![image-20231017225224143]()
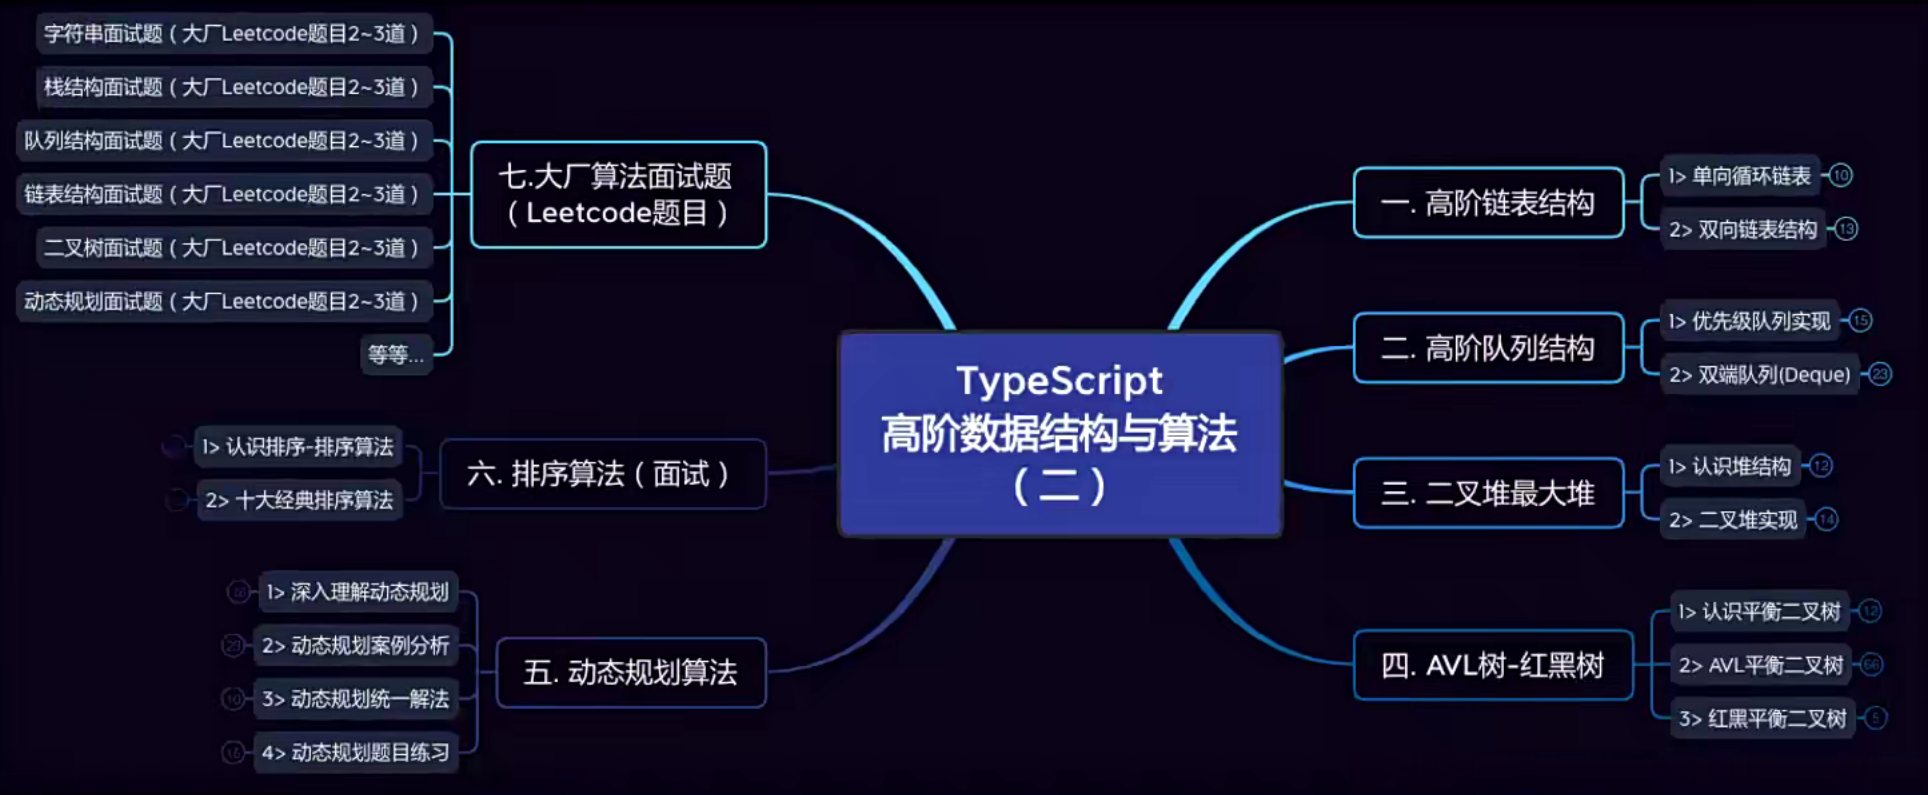
高阶数据结构与算法
![image-20231018093540755]()
常见数据结构:数组(Array)、栈结构(Stack)、队列(Queue)、链表(LinkedList)、堆结构(Heap)、树结构(Tree)、散列表(Hash)、图结构(Craph)
什么是数据结构
存储和组织数据的方式什么是算法(算法的定义)
一个有限的指令集,每条指令的描述不依赖于语言
接受一些输入(有些情况下不需要输入)
产生输出
一定在有限步骤之后终止
算法并不只是那些高大上的东西,你在一个函数(如 sum 函数、fomat 函数)里写的功能其实都是算法。
# 一、数组 Array
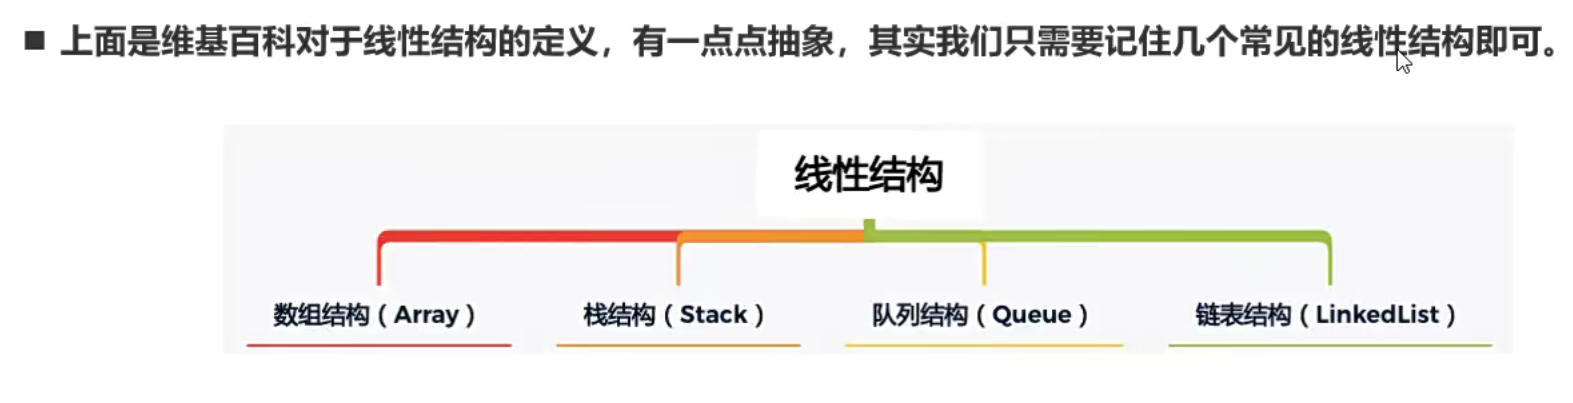
线性结构
线性结构是由 n(n≥0)个数据元素(结点)组成的有限序列
![image-20231019222855252]()
数组结构
数组的内存是连续的,所以数组在知道下标值的情况下访问效率是非常高的
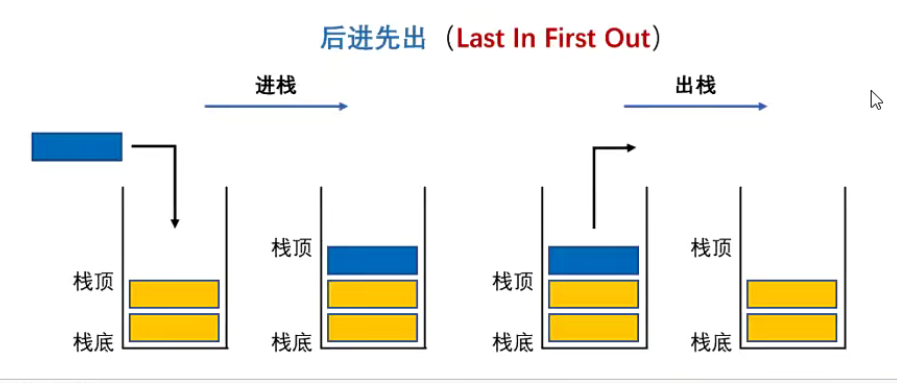
# 二、栈 Stack
# 1、认识栈结构和特性
我们知道数组是一种 线性结构 ,并且可以在数组的 任意位置 插入和删除数据,但有时候我们为了实现某些功能,必须对任意性加以限制,而栈和队列就是比较常见的 受限的线性结构
栈结构示意图
![image-20231019224950547]()
特性
![image-20231020212121813]()
# 2、栈结构特性 —— 面试题
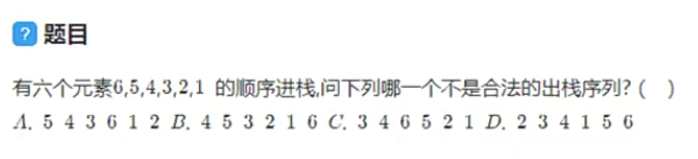
解析
![]()

<img src="https://eucli-1314359160.cos.ap-beijing.myqcloud.com/test/image-20231020213229093.png" alt="image-20231020213229093" style="zoom:50%;" />
十进制转二进制
要把十进制转二进制,是将十进制除二取余直到 0 为止,然后将各个余数从后往前排就是该十进制的二进制,可以利用栈结构的特点(后进先出)
// 这里用 string 是因为如果还是 number 二进制也会以十进制的形式表示function decimalToBinary(decimal:number):string {
//1. 创建一个栈,用于存放余数 ArrayStackconst stack = new ArrayStack<number>()
//2. 使用循环:while(不确定次数,只知道循环的结束条件) /for (知道循环的次数时)while(decimal > 0) {
const result = decimal % 2
stack.push(result)
decimal = Math.floor(decimal / 2)
}//3. 所有的余数都已经放入了栈中,依次取出即可let binary = ''
while(!stack.isEmpty()) {
binary += stack.pop()
}return binary}console.log(decimalToBinary(35))
有效的括号
题目:给定一个只包含
(,),{,},[,]的字符串 s,判断字符串是否有效括号必须成对出现,有一一对应关系,如
({})[],像([)]就不行。- 左括号必须用相同类型的右括号闭合
- 左括号必须以正确顺序闭合
- 每个右括号都有一个对应类型的左括号
思路:将给的字符串做一个遍历,先判断左括号,每遍历到一个左括号就把对应类型的一个右括号压入栈中(注意不是压字符串的右括号),
![image-20231028223114887]()
代码实现
import ArrayStack from '地址'
function isValid(s:string):boolean {
//1. 创建栈结构const stack = new ArrayStack<string>()
//2. 遍历 s 中的所有的括号for(let i = 0;i < s.length, i++) {
const c = s[i]
switch (c) {
cace "(":
stack.push(")")
breakcace "{":
stack.push("}")
breakcace "[":
stack.push("]")
breakdefault:
if(c !== stack.pop()) return false
break}}return stack.isEmpty()
}console.log(isValid("()"))
console.log(isValid("(]"))

# 3、实现栈结构封装
# 1. 基于数组实现
常见的栈有哪些操作呢?
<img src="https://eucli-1314359160.cos.ap-beijing.myqcloud.com/test/image-20231024131518576.png" alt="image-20231024131518576" style="zoom:80%;" />
// 封装一个栈 | |
class ArrayStack<T> { | |
// 定义一个数组 / 链表,用于存储元素 | |
private data:T[] = [] | |
// 实现栈中相关的操作方法 | |
//push 方法:将一个元素压入栈中 | |
push(element:T) { | |
this.data.push(element) | |
} | |
//pop 方法:将栈顶的元素弹出栈(返回出去,并且从栈顶移除掉) | |
pop():T { | |
return this.data.pop() | |
} | |
//peek 方法:看一眼栈顶元素,但是不进行任何操作 | |
peek():T | undefined { | |
return this.data[this.data.length - 1] | |
} | |
//isEmpty 方法:判断栈是否为空 | |
isEmpty():boolean { | |
return this.data.length === 0 | |
} | |
//size 方法:返回栈的数据的个数 | |
size():number { | |
return this.data.length | |
} | |
} | |
// 创建栈实例 | |
const stack1 = new ArrayStack<string>() | |
stack1.push("abc") | |
const stack2 = new ArrayStack<number>() | |
stack2.push(124) |
# 2. 基于链表实现
// 定义栈的结构 | |
interface IStack<T> { | |
push(element:T):void | |
pop():T|undefined | |
peek():T|undefined | |
isEmpty():boolean | |
size():number | |
} | |
// 封装一个栈 | |
class LinkStack<T> implements IStack<T>{ | |
push(element:T):void { | |
this.data.push(element) | |
} | |
//pop 方法:将栈顶的元素弹出栈(返回出去,并且从栈顶移除掉) | |
pop():T|undefined { | |
return this.data.pop() | |
} | |
//peek 方法:看一眼栈顶元素,但是不进行任何操作 | |
peek():T | undefined { | |
return this.data[this.data.length - 1] | |
} | |
//isEmpty 方法:判断栈是否为空 | |
isEmpty():boolean { | |
return this.data.length === 0 | |
} | |
//size 方法:返回栈的数据的个数 | |
size():number { | |
return this.data.length | |
} | |
} |
# 三、队列 Queue
# 1、认识队列和其特性
队列也是一种受限的线性结构,其特性为先进先出,队列结构还有两个特点:
- 只允许在队列的 ** 前端 (front)** 进行
删除操作 - 在队列的 ** 后端 (rear)** 进行
插入操作
队列在开发中还有很多应用,如线程队列,很多算法也会用到队列(如二叉树中的层序遍历)
# 2、实现队列结构封装
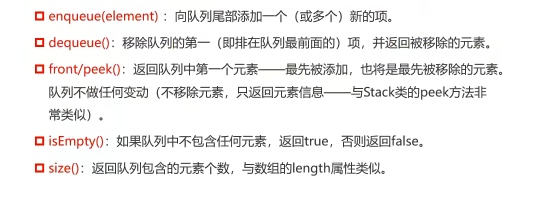
队列的常见操作
![]()
# 1. 基于数组实现
interface IQueue<T> { | |
// 入队方法 | |
enqueue(element:T):void | |
// 出队方法 | |
dequeue():T | undefined | |
// 返回队列中第一个元素 | |
peek():T | undefined | |
// 判断是否为空 | |
isEmpty():boolean | |
// 元素的个数 | |
get size():number | |
} | |
class ArrayQueue<T> implements IQueue<T> { | |
// 内部使用过数组(链表保存) | |
pivate data:T[] = [] | |
enqueue(element:T):void { | |
return this.data.push(element) | |
} | |
dequeue():T | undefined { | |
return this.data.shift() | |
} | |
peek():T | undefined { | |
return this.data[0] | |
} | |
isEmpty():boolean { | |
return this.data.length === 0 | |
} | |
get size():number { | |
return this.data.length | |
} | |
} | |
const queue = new ArrayQueue<string>() | |
queue.enqueue("abc") | |
queue.enqueue("cba") | |
queue.enqueue("nba") | |
console.log(queue.dequeue()) | |
console.log(queue.peek()) | |
console.log(queue.size) // 用了 get,就不用加括号调用了 |
# 2. 基于链表实现(性能更好)
# 3、队列结构常见方法
# 4、队列结构面试题
# 击鼓传花
几个人围成一圈,开始数数,数到某个数字 (假设是 3) 的人自动淘汰,最后剩下的人会获得胜利,问最后这个人的名字或者位置?
循环:queue.size ()> 1
循环体内完成什么操作:
- 数的是 1,2 的人,操作出队 -> 入队
- 数的是 3 的人,只出队,不需要入队
return queue.dequeue ()
import ArrayQueue from '地址' | |
function hotPotato(names:string[],num:number) { | |
const queue = new ArrayQueue<string>() | |
// 将所有的 name 入队操作 | |
for(const name of names) { | |
queue.enqueue(name) | |
} | |
// 淘汰的规则 | |
while(queue.size > 1) { | |
//1,2 不淘汰 | |
for(let i = 1; i < num; i++) { | |
const name = queue.dequeue()! | |
queue.enqueue(name) | |
} | |
//3 淘汰 | |
queue.dequeue() | |
} | |
return queue.dequeue() | |
} | |
const lastName = hotPotato(["why","james","kobe","curry"],3) | |
console.log(lastName) |
# 约瑟夫环
0,1,・・・,n-1 这 n 个数字排成一个圆圈,从数字 0 开始,每次从这个圆圈里删除第 m 个数字(删除后从下一个数字开始计数),求出这个圆圈里剩下的最后一个数字
例如:0、1、2、3、4 这 5 个人数字组成一个圆圈,从数字 0 开始每次删除第 3 个数字,则删除的前 4 个数字依次是 2、0、4、1,因此最后剩下的数字是 3代码实现
import ArrayQueue from '地址' | |
function lastRemaining(n:number,m:number) { | |
const queue = new ArrayQueue<number>() | |
// 将所有数字加入到队列中 | |
for(let i = 0; i < n; i++) { | |
queue.enqueue(i) | |
} | |
// 判断队列中是否还有数字 | |
while(queue.size > 1) { | |
for(let i = 1; i < m; i++) { | |
queue.enqueue(queue.dequeue()!) | |
} | |
queue.dequeue() | |
} | |
return queue.dequeue()! | |
} | |
console.log(lastRemaining(5,3)) |
- 动态规划实现
function lastRemaining(n:number,m:number) { | |
let position = 0 | |
for(let i = 2; i <= n; i++) { | |
position = (position + m) % i | |
} | |
return position | |
} |
# 四、链表 LinkedList
# 1、认识链表及其特性
链表和数组一样可以用于存储一系列的元素,但链表和数组的实现机制完全不同
数组也有很多缺点:
- 数组创建通常需要申请一段连续的内存,并且大小是需要扩容固定的,所有当前数组不能满足容量需求时
- 在数组开头或中间插入数据的成本很高,需要进行大量元素的位移
- 相对于数组,链表的优点
- 链表的元素在内存中不必是连续的空间。链表的每个元素由一个
存储元素本身的节点和一个指向下一个元素的引用(也可称为指针)组成 - 链表不必在创建时就确定大小,并且可以无限的延伸下去
- 链表在插入和删除数据时,时间复杂度可以达到 O (1)
- 相对于数组,链表的缺点
- 链表访问任何一个位置的元素时,需要从头开始访问(无法跳过第一个元素访问任何一个元素)
- 无法通过下标直接访问元素,需要从头一个个访问,直到找到对应元素
链表类似于火车,有车厢和连接下一个车厢的节点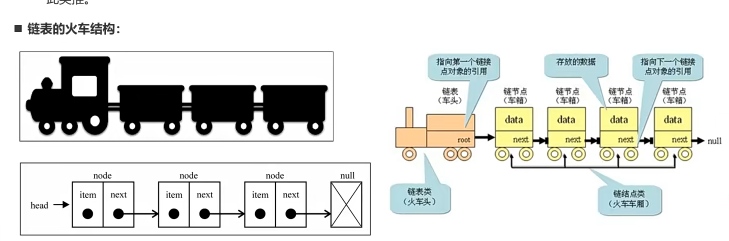
item 是 “车厢” 的数据,也可以叫 value、element 等
# 2、封装链表的类结构
要封装两个类
//1. 创建 Node 节点类 | |
class Node<T> { | |
value:T | |
next:Node<T> | null = null // 默认值设置为 null | |
constructor(value:T) { | |
this.value = value | |
} | |
} | |
//2. 创建 LinkedList 类 | |
class LinkedList<T> { | |
head:Node<T> | null = null | |
size:number = 0 | |
get length() { | |
return this.size | |
} | |
} |
# 3、封装链表相关方法
- 链表常见方法:
- append (element): 向链表尾部插入一个新的项
- insert (position,element): 向链表的特定位置插入一个新的项
- get (position): 获取对应位置的元素
- indexOf (element): 返回元素在链表中的索引,如果链表中没有该元素则返回 - 1
- update (position,element): 修改某个元素的位置
- removeAt (position): 从链表的特定位置移除一项
- remove (element): 从链表中移除一项
- isEmptu (): 如果链表不包含任何元素,返回 true,否则返回 false
- size (): 返回链表包含的元素个数,与数组的 length 属性类型
# 1. append 方法
向链表尾部追加数据可能有两种情况:
- 链表本身为空,新添加的数据为唯一的节点
- 链表不为空,需要在其他节点后面追加节点
//1. 创建 Node 节点类 | |
class Node<T> { | |
value:T | |
next:Node<T> | null = null // 默认值设置为 null | |
constructor(value:T) { | |
this.value = value | |
} | |
} | |
//2. 创建 LinkedList 类 | |
class LinkedList<T> { | |
head:Node<T> | null = null | |
size:number = 0 | |
get length() { | |
return this.size | |
} | |
append(value:T) { | |
//1. 根据 value 创建一个新节点 | |
const newNode = new Node(value) | |
//2. 判断链表是否为空(即 this.head 是否为 null) | |
if(!this.head) { | |
this.head = newNode | |
}else { | |
// 创建一个临时变量 | |
let current = this.head | |
while(current.next) { | |
current = current.next | |
} | |
// 出了循环,就说明此时 current 肯定是指向最后一个节点的,这时候为最后的节点连接上新添加的节点 | |
current.next = newNode | |
} | |
//size 增加 | |
this.size++ | |
} | |
// 遍历链表并打印的方法 | |
traverse() { | |
const values:T[] = [] | |
let current = this.head | |
while(current) { | |
values.push(current.value) | |
current = current.next | |
} | |
console.log(values.join("->")) | |
} | |
} | |
const LinkedList = new LinkedList<string>() | |
LinkedList.append("aaa") | |
LinkedList.append("bbb") |
# 2. insert 方法
- 确定 position 的边界
- 插入的位置有两种情况:
- 插入到最前面
- 插入到其他地方
// 插入方法 | |
insert(value:T,position:number):boolean { | |
//1. 越界的判断 | |
if(position < 0 || position >= this.size) return false | |
//2. 根据 value 创建一个新的节点(待插入) | |
const newNode = new Node(value) | |
//3. 判断是否插入到头部 | |
if(position === 0) { | |
newNode.next = this.head | |
this.head = newNode // 这两行代码不能反过来,不然头结点和新插入的节点就会互相指向,独立出来了 | |
}else { | |
// 这里用双指针,previous 表示 current 的前一个节点 | |
let current = this.head | |
let previous:Node<T> | null = null | |
let index = 0 | |
while(index++ < position) { | |
previous = current | |
current = current!.next | |
} | |
// 跳出循环表示此时 index === position | |
previous!.next = newNode | |
newNode.next = current | |
} | |
this.size++ | |
return true | |
} |
# 3. removeAt
两种情况:
- 移除第一项信息
移除第一项时,直接让 head 指向第二项信息就可以了。之后因为第一项信息没有引用指向,就在链表中不再有效,后面会被回收掉 - 移除其他项信息
移除其他项的信息操作方式是相同的。首先,通过 while 循环找到正确的位置,然后就可以直接将上一项 previous 的 next 指向 current 项的 next,这样中间的项就没有引用指向它,之后会被回收
// 删除方法(根据位置移除对应数据) | |
removeAt(position:number):boolean { | |
//1. 越界的判断 | |
if(position < 0 || position >= this.size) return false | |
//2. 判断删除的是不是第一个节点 | |
if(position === 0) { | |
this.head = this.head!.next | |
}else { | |
let current = this.head | |
let previous:Node<T> | null = null | |
let index = 0 | |
while(index++ < position) { | |
previous = current | |
current = current!.next | |
} | |
// 跳出循环表示此时 index === position, 找到了需要的节点 | |
previous!.next = current?.next ?? null | |
} | |
this.size-- | |
return true | |
} |
# 4. get 方法
// 获取对应位置的元素 | |
get(position:number):T|null { | |
//1. 越界的判断 | |
if(position < 0 || position >= this.size) return null | |
//2. 查找并返回元素 | |
let index =0 | |
let current = this.head | |
while(index++ < position) { | |
current = current!.next | |
} | |
// 查找到元素,返回 | |
return current?.value ?? null | |
} |
# 5. 封装私有方法
# 根据 position 获取当前的节点(注意不是节点的值,而是获取节点本身)
private getNode(position:number):Node<T>|null { | |
let index =0 | |
let current = this.head | |
while(index++ < position) { | |
current = current!.next | |
} | |
return current | |
} |
这样, current = this.getNode(position) , previous = this.getNode(position-1)
# 6. update 方法
update(value:T,position:number):boolean { | |
//1. 越界的判断 | |
if(position < 0 || position >= this.size) return false | |
// 获取相应位置节点,直接更新即可 | |
current = this.getNode(position) | |
current!.value = value | |
return true | |
} |
# 7. indexOf 方法
// 根据值,获取对应位置的索引 | |
indexOf(value:T):number { | |
// 从第一个节点开始向后遍历 | |
let index = 0 | |
let current = this.head | |
while(current) { | |
if(current.value === value) { | |
return index | |
} | |
current = current.next | |
index++ | |
} | |
return -1 | |
} |
# 8. remove
// 删除方法(根据元素移除对应数据) | |
remove(value:T):boolean { | |
const index = this.indexOf(value) | |
return this.removeAt(index) | |
} |
# 4、链表常见的面试题
# 1. 面试题一:手写链表
见上文
# 2. 面试题二:删除链表中的节点
有一个单链表的 head,我们想删除它其中一个节点 node
条件:
- 给你一个需要删除的节点
- 你无法访问第一个节点 head
链表的所有值都是唯一的,并且保证给定的节点 node 不是链表中最后一个节点
注意,删除节点并不是指从内存中删除它。这里的意思是:
- 给定节点的指不应该存在于链表中
- 链表中的节点数应该减一
- node 前面的所有值顺序相同
- node 后面的所有值顺序相同

思路:
- 把 "5" 改成 "1"
- 让 value 为 "5" 的节点的 next 指向其 next 的 next(即指向 "9")
- 这样虽然看起来是把值为 "1" 的节点删了,但因为第一步 "5" 已改成 "1" 了,所以相当于有两个 "1" 节点,删掉一个还剩一个,就等于删掉了 "5"
<img src="https://gitee.com/eucli312/img/raw/master/1699072305848-2023-11-4.jpg" alt="IMG_20231103_214705-2023-11-4.jpg" style="zoom:150%;" />
class ListNode { | |
val:number; | |
next:ListNode|null; | |
constructor(val:?number,next?:ListNode|null) { | |
this.val = val === undefined ? 0 :val; | |
this.next = next === undefined ? null : next; | |
} | |
} | |
function deleteNode(node:ListNode | null):void { | |
// 在这里写代码实现功能 | |
node!.val = node!.next!.val | |
node!.next = node!.next!.next | |
} |
# 3. 面试题三:反转链表
p998

# 3.1 反转链表(非递归)


让 current 节点指向 head 节点的下一个节点。(目的:保留下一个节点的引用,保证其可以拿到且不会因为之后没有被引用而被销毁)
改变 head 当前指向的节点,令其指向 newHead。(对于第一个节点来说,指向 newHead 就是指向 null)
让 newHead 指向 head 节点。(目的:下一次遍历时,第二步可以让下一节点指向第一个节点)
让 head 移动到下一个节点:即让 head 指向 current
进行一次上面的操作可以反转一个节点
class ListNode { | |
val:number; | |
next:ListNode|null; | |
constructor(val:?number,next?:ListNode|null) { | |
this.val = val === undefined ? 0 :val; | |
this.next = next === undefined ? null : next; | |
} | |
} | |
function reverseList(head:ListNode | null):ListNode | null { | |
// 在这里写代码实现功能 | |
//1. 判断节点为 null 或者只有一个节点,那么直接返回即可 | |
if(head === null || head.next === null) return head | |
//2. 反转链表结构 | |
let newHead:ListNode|null = null | |
while(head) { | |
let current:ListNode|null = head.next | |
head.next = newHead | |
newHead = head | |
head = current | |
} | |
return newHead | |
} |
# 3.2 反转链表(递归)
p999
<img src="https://gitee.com/eucli312/img/raw/master/2023-11-6-793Screenshot_2023-11-06-22-18-24-640_com.baidu.netd.jpg" alt="2023-11-6-793Screenshot_2023-11-06-22-18-24-640_com.baidu.netd.jpg" style="zoom:67%;" />
<img src="https://gitee.com/eucli312/img/raw/master/2023-11-6-792Screenshot_2023-11-06-22-19-48-574_com.baidu.netd.jpg" alt="2023-11-6-792Screenshot_2023-11-06-22-19-48-574_com.baidu.netd.jpg" style="zoom:67%;" />
<img src="https://gitee.com/eucli312/img/raw/master/2023-11-6-789Screenshot_2023-11-06-22-21-19-772_com.baidu.netd.jpg" alt="2023-11-6-789Screenshot_2023-11-06-22-21-19-772_com.baidu.netd.jpg" style="zoom:67%;" />
function reverseList(head:ListNode | null):ListNode | null { | |
// 在这里写代码实现功能 | |
// 如果使用的是递归,那么递归必须要有结束条件 | |
if(head === null || head.next === null) return head | |
const newHead = reverseList(head?.next ?? null) | |
// 完成想要的操作是在这个位置 | |
// 第一次来到这里的时候,是倒数第二个节点 | |
head.next.next = head | |
head.next = null | |
return newHead | |
} |
# 5、算法的复杂度分析
<img src="https://gitee.com/eucli312/img/raw/master/2023-11-6-790Screenshot_2023-11-06-22-41-05-714_com.baidu.netd.jpg" alt="2023-11-6-790Screenshot_2023-11-06-22-41-05-714_com.baidu.netd.jpg" style="zoom:80%;" />
<img src="https://gitee.com/eucli312/img/raw/master/2023-11-6-786Screenshot_2023-11-06-22-45-45-540_com.baidu.netd.jpg" alt="2023-11-6-786Screenshot_2023-11-06-22-45-45-540_com.baidu.netd.jpg" style="zoom:80%;" />